
How To Personalize Sublimation Gaming Mats
If you feel that yours or another’s PC gaming desk needs a little more color, there’s no need to stop at those fancy LED lights! In this video, I’ll be showing you how the SubliCraft gaming mat can be personalized with your vivid images through sublimation, featuring the HPN CraftPro swing away heat press.
With all the most essential pieces of a PC gaming setup together, perhaps it's time to level it up with a personalized mat for your mouse and keyboard.

SubliCraft now offers sublimation gaming mats ranging from small mouse pad to large desk pad sizes. All sizes will be ready to take your bold and vivid sublimation transfers, and are constructed with robust stitched edges that prevent wear over regular use. With its smooth polyester surface and non-slip rubber base, SubliCraft gaming mats feel sleek enough for long gaming sessions and won’t be sliding away from your desk any time soon.

While the largest 18"x16" and 24"x14" gaming mats will require a large format sublimation printer and paper for full bleed images, you’ll be able to print such images for the 12.5"x10" mat with a desktop sublimation printer. All that’s required is a printer that can load at least 11"x17" paper, such as the Sawgrass SG1000. Assuming you have the properly sized machine, you may begin by finding or creating an image scaled down to the imprint area of your mat.

If you’re using photo editing or graphic design software to prepare your image, you can create the document at the exact size of the mat, but with a quarter-inch added to both the width and height. This will provide you with enough bleed area to place your mat on the printed transfer without the risk of your image clipping when it’s applied. As soon as your image is ready, you may print it through your sublimation printer. For Sawgrass printers, send it to Sawgrass Print Manager and make sure it’s set to print through your SG1000. Then you may use these settings: Substrate set to Polyester, paper set to your paper’s profile, leave Mirror checked, and change the Color Mode in the Color tab to Photographic or Vivid depending on your image’s level of detail. With all these set, go ahead and click Print on SPM.

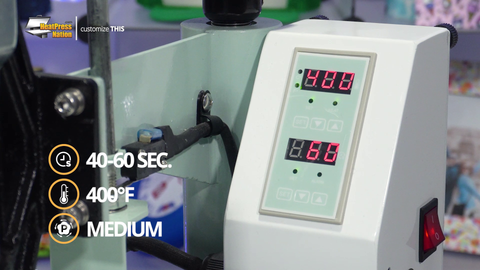
Now that the image has been printed, we’re ready to apply it to our gaming mat! Turn on your heat press and set it to 40-60 seconds at 400 degrees Fahrenheit with medium pressure. The amount of press time will depend on the size of your mat, but in our case, 40 seconds will be enough to cover the 12.5"x10" mat. Despite its small size, the 12"x15" HPN CraftPro swing away heat press we’re demonstrating is still capable of holding the 12.5"x10" SubliCraft gaming mat. So if you’re looking for a machine compact enough to handle many essential flat items, the CraftPro swing away press is a solid choice to go with.
Once your machine hits temperature, cover the lower platen with a sheet of parchment paper, then add your transfer on top. Next is to place your mat above the transfer, flipping it white side down and centering it to the printed image. To keep it in place, you may attach the mat to the transfer using heat tape or adhesive spray. If you do use adhesive spray, we recommend doing so away from your machine, applying a light spraying to the transfer itself for the mat to adhere onto. But once your items are attached together, flip it with the paper side up, cover it with another parchment paper sheet and press.

When the time reaches zero, open your machine and allow the items to have a moment to cool down. Afterwards, quickly peel the transfer off your mat and it’s now been personalized with an awesome sublimation transfer!

If you’d like to share your custom sublimation gaming mats with us, alongside a large community of heat transfer enthusiasts, feel free to join our HeatPressNation Creators Facebook group at heat.press/FBGroup. If you have any other questions about sublimation or heat pressing in general please reach out to us at support.heatpressnation.com.
